Colour, chlorophyll and chromatography Teach article
Use thin-layer chromatography to discover the variety of pigments that play a role in photosynthesis and give leaves their colour.
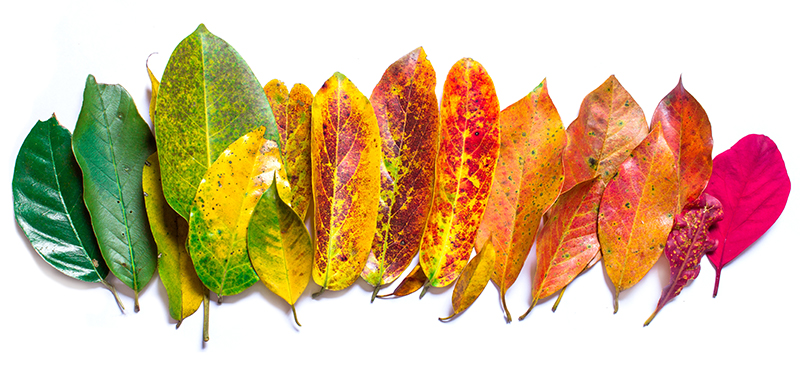
Looking out over a lush green valley or forest, it is fascinating to see the array of different shades. Leaves range from light to dark and even speckled. The colours are determined by the presence of different pigments, many of which are responsible for one of the most interesting and important metabolic reactions in living organisms: photosynthesis.
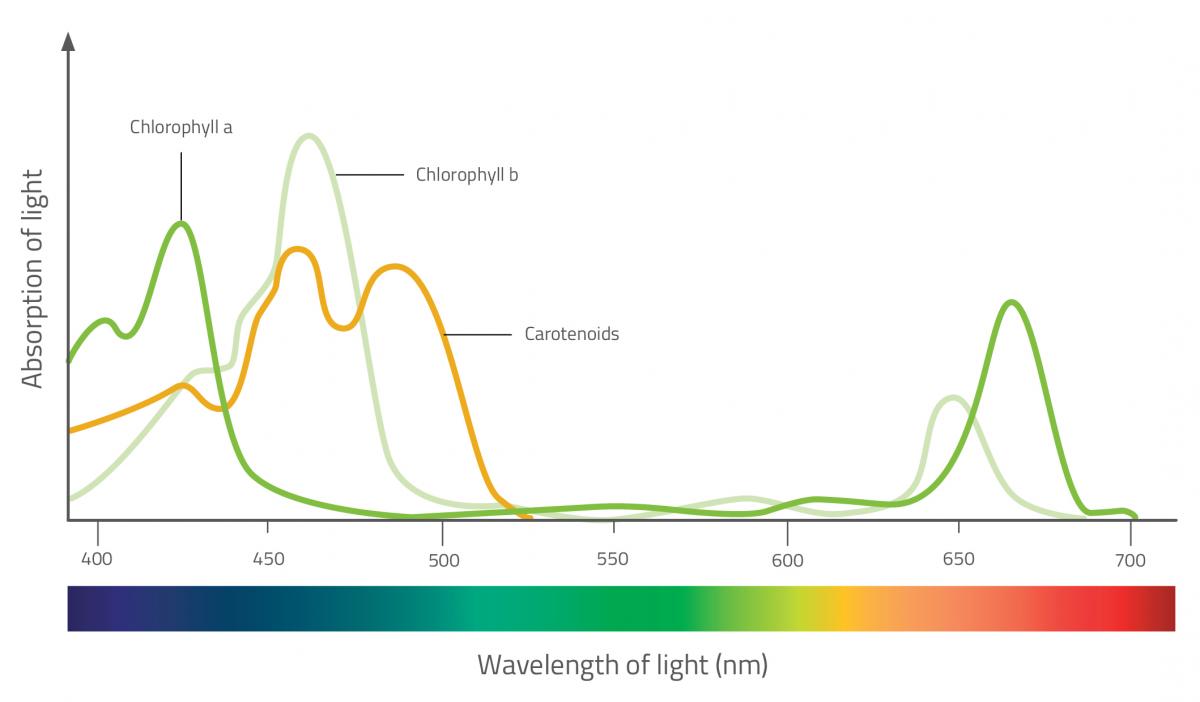
Photosynthetic pigments are located in the chloroplasts of the leaf. They capture energy from the visible light spectrum, which they use to synthesise carbohydrates from inorganic matter. There are many types of photosynthetic pigments, but the two main groups are chlorophylls and carotenoids (which are further split into two classes: carotenes and xanthophylls). Each type absorbs a different wavelength, so that together they capture more light.
Chlorophylls are the pigments primarily responsible for photosynthesis. They absorb red and blue light, and reflect green light, which is what gives leaves their green colour. Carotenoids, on the other hand, reflect yellow, orange and red – the colour of leaves during autumn. During this time of year, chlorophyll breaks down so the carotenoid pigments become visible.
Carotenoids assist with photosynthesis by absorbing wavelengths of light that chlorophylls cannot absorb. They transfer energy to chlorophyll molecules and also help to protect the leaf from excess light – they absorb surplus light energy and dissipate it as heat to prevent it from damaging the leaf.
Other non-photosynthetic pigments, such as anthocyanins or other flavonoids, determine the colour of flowers, so their absorption spectra vary. The function of these pigments is to attract insects or birds for pollination.
Nicola Graf
Separating leaf pigments using thin-layer chromatography
This article presents a simple laboratory experiment to understand leaf pigments. Students use thin-layer chromatography to separate the various pigments that are present in two different leaf extracts. They identify each pigment and determine whether the two extracts have any pigments in common. The experiment is suitable for students aged 11–16 and takes 1–2 hours to complete.
Note that we used leaves from Epipremnum aureum (commonly known as devil’s ivy) and Ficus benjamina (commonly known as weeping fig), but any species could be used for the leaf extracts. You might also like to carry out the experiment using a brightly coloured flower, such as those in the Petunia genus, and also a yellow or orange leaf.
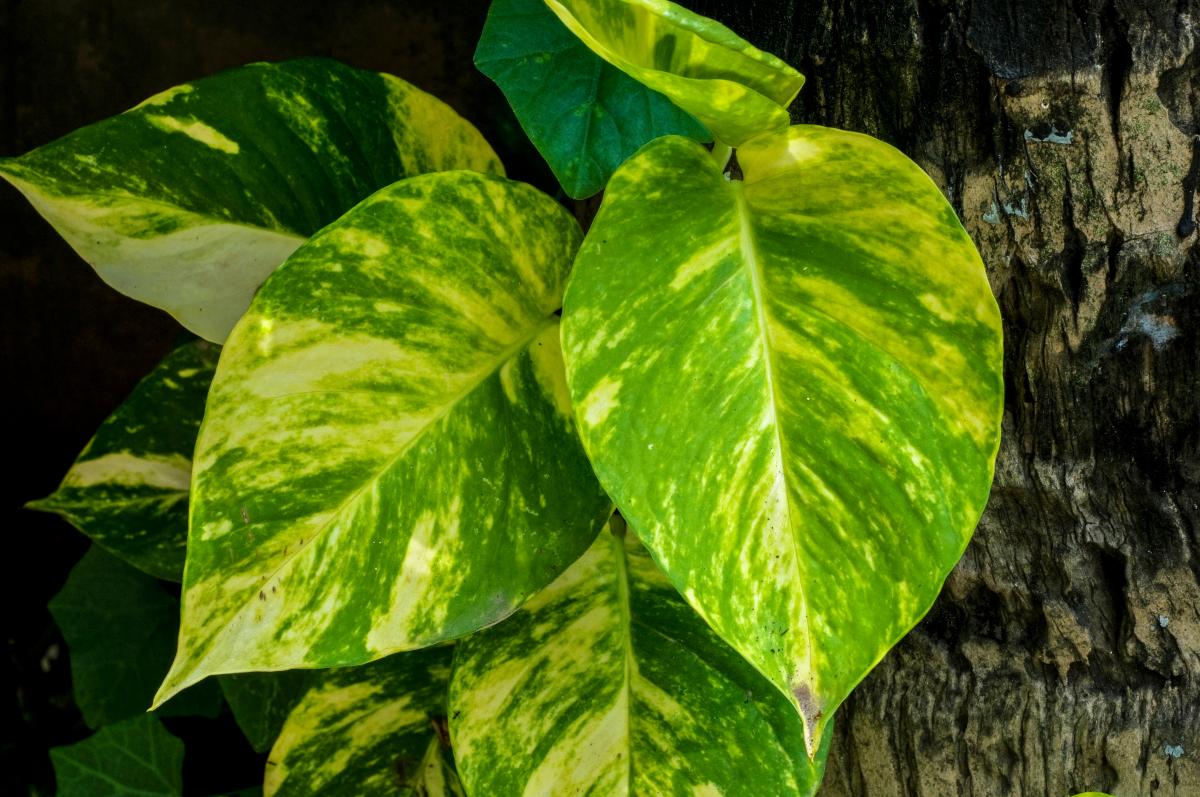
Joydeep/Wikimedia Commons, CC BY-SA 3.0

JM Garg/Wikimedia Commons, CC BY 3.0
For the thin-layer chromatography, we use a combined mobile phase of hexane, acetone and trichloromethane (3:1:1) as it provides the best separation result. However, it requires part of the activity to be carried out inside a fume hood by the teacher. This mobile phase separates the pigments most clearly, but you could adapt the activity to use mobile phases of hexane or ethanol alone, which the students can carry out themselves. Both hexane and ethanol successfully separate the pigments, but the distinction between each pigment is not as clear as when the combined solvent is used.
Materials
- Leaf samples (e.g. E. aureum and F. benjamina), cut into pieces measuring approximately 2 cm x 2 cm
- Thin-layer chromatography plates (10 cm x 5 cm) pre-coated with silica gel
- Organic solvent comprised of:
- 3 parts hexane, C6H14
- 1 part acetone, (CH3)2CO
- 1 part trichloromethane, CHCl3
- A beaker and watch glass (or chromatography chamber)
- Spotting tile
- Mortar and pestle
- 1 ml Pasteur pipettes (one for each leaf sample)
- Pencil
Safety note
A lab coat, gloves and eye protection should be worn. The solvents used in this experiment are flammable, so they must not be used near flames. The combined solvent (hexane, acetone and trichloromethane) must only be used inside a fume hood due to the volatility, smell and health risks associated with it.
Procedure
The following steps should be carried out by the students:
- Place your first leaf sample in the mortar. Pipette 1 ml of acetone into the mortar and use the pestle to grind the sample until the leaf is broken down.
- Transfer the mixture to a well of the spotting tile using the pipette.
- Wash the mortar and pestle, and repeat steps 1–2 using the second leaf sample. Use a new pipette to add 1 ml of acetone and use this pipette to transfer the mixture to a new well of the spotting tile.
- Take the chromatography plate and draw a horizontal line 1.5 cm from the bottom using a pencil. Take care not to touch the plate with your fingers.
- Using your first pipette (take care not to mix up which pipettes were used for each leaf sample), draw up some of your first leaf sample. Apply a single, small drop to the pencil line on the left hand side of the chromatography plate. Make sure to leave enough space to fit the second sample on the right hand side.
- Wait a few seconds until it dries, and apply a second drop on the same spot. Continue until you have added around 10 drops.
- Using your second pipette, repeat steps 5 and 6 for the second leaf sample by adding it to the right hand side of the plate.
- Allow the plate to dry completely.
The following steps must be carried out by the teacher:
- Inside the fume hood, combine the solvents in the following proportions: hexane, acetone and trichloromethane, 3:1:1.
- Add the combined solvent to the beaker. You should add only a shallow layer of solvent, so that the pencil line on the chromatography plate will not be submerged.
- Place the chromatography plate vertically into the beaker, with the pencil line at the bottom, and cover the beaker with a watch glass. Students can watch as the solvent moves up the plate and the pigments separate.
- Wait until the solvent has travelled roughly 6 cm from the starting point (this will take approximately 15–30 minutes) before removing the plate from the beaker, leaving it inside the fume hood.
- Use a pencil to quickly mark the furthest point reached by the solvent. Allow the plate to dry completely before removing it from the fume hood.
The following steps should be carried out by the students:
- Photograph the chromatogram as soon as it is dry. The colours will fade within a few hours. Print out a copy of the photograph for your notes.
- Using the chromatogram photo, try to work out how many pigments are present in each leaf extract.
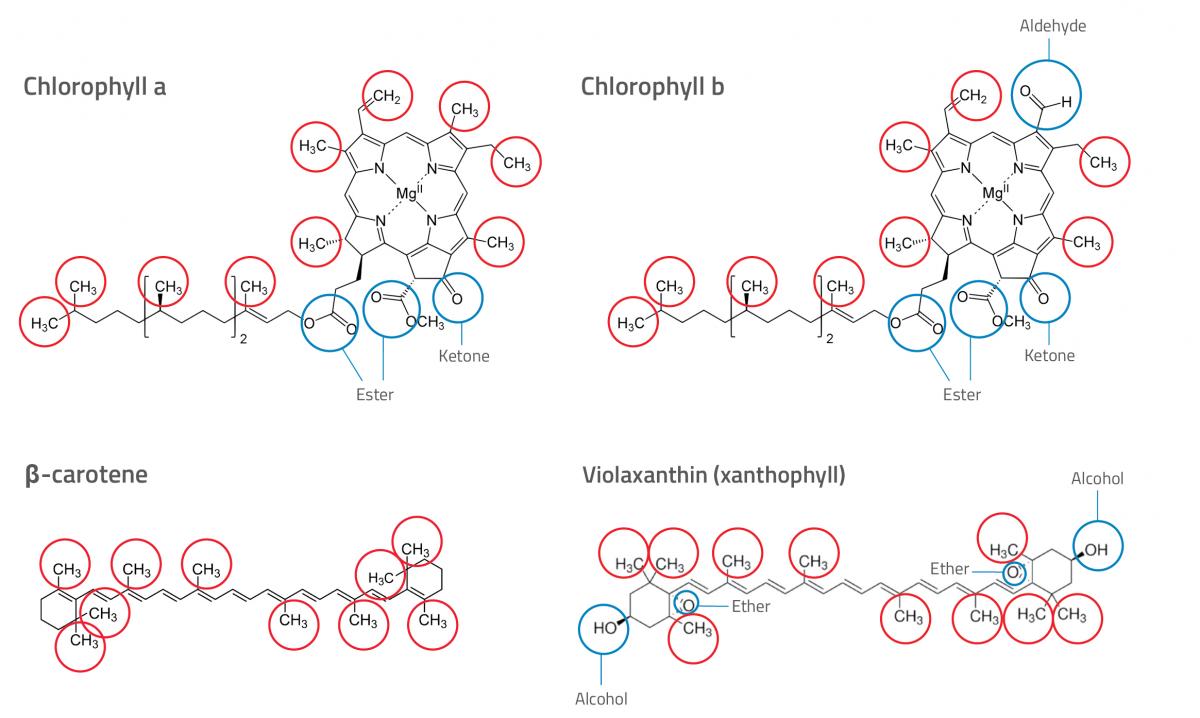
- Now look at the chemical structures of different pigments (see figure 1). Can you determine which pigment is which (see the explanation section for more guidance)? Write down your answers.
- Measure the distances travelled by the solvent and the pigments, and calculate the retardation factor (Rf) using the following equation:
Rf = (distance travelled by pigment) / (distance travelled by solvent)
Record your results in a table. Compare these to the values in table 1: were your answers correct?
Nicola Graf
Explanation
The different pigments in a leaf extract are separated based on their affinities for the stationary phase (the silica on the thin-layer chromatography plate – a polar substance) and the mobile phase (the solvent – a nonpolar substance). Compounds with a high affinity for the solvent (i.e. nonpolar compounds) will move much further than compounds with a high affinity for silica (i.e. polar compounds).
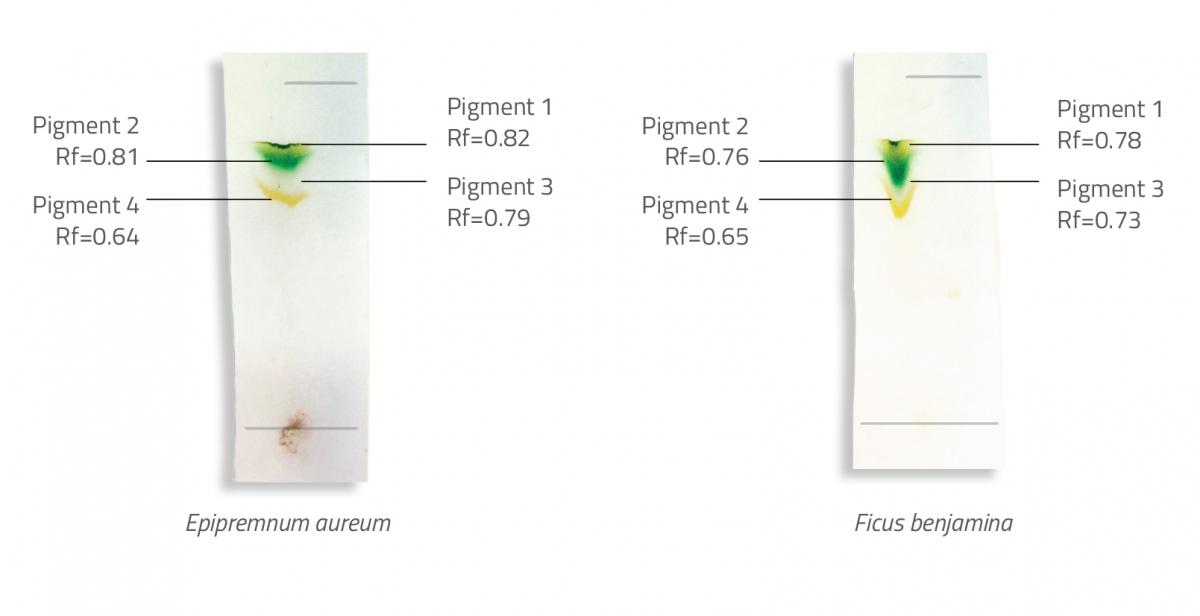
In our example (see figure 2), both leaf extracts contained four pigments. Pigment 4 moved a shorter distance than pigment 1, indicating that pigment 4 is more polar and pigment 1 is less polar. By looking at the chemical structures of different pigments and the polar and nonpolar groups, students can try to identify the pigments in each of the leaf extracts.
They will need to know that, of the functional groups present in the pigments in figure 1, alcohol groups are the most polar, ester and ether groups the least polar, and aldehyde and ketone groups are in between. From this, we can deduce that carotenes are the least polar pigments (no polar groups), and xanthophylls are the most polar (two alcohol groups, one at each end of the molecule). Therefore, pigments 1 and 2 are likely to be carotenes, and pigment 4 is likely to be a xanthophyll. Pigment 3 is likely to be chlorophyll, since it is more polar than carotenes but less polar than xanthophylls. You can observe the characteristic green colour from chlorophyll on the chromatogram.
Josep Tarragó-Celada
Now look at the Rf values, which range between 0 and 1, with 0 being a pigment that does not move at all, and 1 indicating a pigment that moves the same distance as the solvent. The Rf value varies depending on the solvent used, but the general order of the pigments (from the highest to the lowest Rf value) usually remains the same, because the nonpolar compounds move further than the polar compounds. Rf values for various pigments (using hexane, acetone and trichloromethane (3:1:1) for the solvent) are shown in table 1.
| Pigment | Rf value |
|---|---|
| β-carotene | 0.98 |
| Chlorophyll a | 0.59 |
| Chlorophyll b | 0.42 |
| Anthocyanins | 0.32-0.62 |
| Xanthophylls | 0.15-0.35 |
Discussion
After the experiment, you can ask your students some of the following questions to gauge their understanding of plant pigments and thin-layer chromatography.
- Look at absorption spectra for various plant pigments. Which pigments absorb the most light from the red end of the spectrum? What colour are they?
- If chlorophyll is the most important photosynthetic pigment, which colours of the visible spectrum are most useful to a plant for photosynthesis?
- Seaweeds are often yellow-brown in colour. Do you think light from the red end or the blue end of the spectrum penetrates water best?
- What species of plants have non-green leaves? How could you find out what pigments they contained?
- Where are photosynthetic pigments located within a leaf?
- Why is it useful for plants to contain several different photosynthetic pigments?
- Why is it important to use a nonpolar solvent (such as hexane, acetone and trichloromethane) and not a polar solvent (such as water) to investigate plant pigments using thin-layer chromatography?
- Why should you avoid touching the thin-layer chromatography plate?
- Why should the plate be completely dry before putting it into the beaker?
- Why do some pigments have a larger Rf value than others?
References
- Reiss C (1994) Experiments in Plant Physiology. Englewood Cliffs, NJ, USA: Prentice Hall. ISBN: 0137012853
Resources
- For an infographic explaining the chemicals behind the colour of leaves, visit the Compound Interest website.
- Read more about the chemical structure of different plant pigments by visiting the Harvard Forest website from Harvard University.
Review
Combining the outdoor element of nature with the identification of different chemical structures produces a perfect applied science lesson. The analysis of the different pigments in leaves has a clear visual outcome that can then be related to the chemical structures of the different photosynthetic pigments.
This practical activity affords students the opportunity to move beyond basic paper chromatography to the more complex technique of thin-layer chromatography. This cross-curricular task will engage students who enjoy biology-based topics such as photosynthesis as well as students who enjoy the problem-solving aspect of analytical techniques in chemistry.
The activity is most suitable for students aged 14–16 as part of a science club or extension activity. In addition to the main method, the authors provide suggestions for using different solvents to enable students to carry out the experiment entirely independently. With further detail, the activity could also be useful for students aged 16–19.
Many new terms are introduced, so the article provides an excellent chance to challenge students to understand concepts such as mobile and stationary phases, polarity of molecules and how biology is fundamentally based on chemical building blocks.
Caroline Evans, head of chemistry, Wellington College, UK